Confessions and Obsessions of a Paper Crafter

Wednesday, June 19, 2013

Back in the Saddle Again

I have no good or ready excuse for being AWOL for so long (and by now you are wondering if I'm a cowgirl or a military sort - really I'm neither), but let's just say life gets in the way sometimes!

This is a birthday card I made for my Darling Husband.  It's made with the Animal Spirit stamps, and coloured with a variety of markers.  My favourite ones to colour these stamps with are Tim's Distress Markers, and those Spica pens, to give a little glitter.  For some of the larger areas that need to be a more neutral colour, I often use a pencil crayon.

And speaking of Distress Markers, is it just me, or are others hoping that some of those "limited edition" Distress Inks(like Mowed Lawn, and Salty Ocean, and Picked Raspberry) are going to find their way to becoming Markers? 

Anyway, back to the Animal Spirit stamps, which I seem to be COLLECTING on a regular basis, I like these, because
they take me back to my youth (and now you think I'm like 90 years old, which I'm not), when I would colour those big Doodle Art Posters, that came with 10 or 12 markers, that would dry out before the darn poster was finished!  These are easier to complete, that's for sure.

And talking about completing, I am very sorry to say that after March, I gave up on the Art Journal Calendar pages.  I did enjoy doing them, but I found I was always trying to catch up, and it was more of a chore than a pleasure, which is what it should be about!

I have been working on another calendar, this one is made with the Graphic 45 papers "Place in Time".  I'm doing one a month, using photos from a trip we took last year to Alaska.  When it's complete, I plan to turn it into a mini album.

Until next time......

Wednesday, January 23, 2013

Dylusional Calendar Challenge

 So my first New Year's RESOLUTION (using up what I have, before I buy anything more - it's the same resolution and make and break every year!) went straight out the window when I took a class involving Dylusions Ink sprays. Of course I had to buy some to try, and then I hit the 'net in an attempt to learn EXACTLY how to use them ( I swear I should have been a researcher).
During my online searches, I came across a calendar challenge by Kate Crane.  I was smitten.  So much colour!  I had to try it!  And so here is my January page.  It's only a singe page, because I'm getting started half way through the month.
The book is sketch book (8 1/2 x 11).  I had read (in my extensive online research sessions) that a layer of gesso would prevent the inks, etc. from soaking through the paper, so I put a layer on both sides.  Then I went crazy with acrylic paint.  I even tried out the credit card technique!

Next came the ink sprays, which didn't always stick on the paint.  But it gave some nice puddling effects.  I bought some light modeling paste, and with a snowflake stencil, added some flakes.  They started off white, but as they dried, they soaked up the ink (which was dry) and turned blue.  You can sort of see one under the "y" in January.  Wanting some white snowflakes (I'm rather traditional), I stamped some in white pigment ink.  But they turned blue too!  Lucky for me the ink is extremely slow drying, and I embossed them in white. 
The snowman is from Tim Holtz, and coloured with Copics.  The finished page now has the feel of wallpaper.  It's very strange, maybe it's the gesso.

The colourful squares are 1 1/2", and the idea is to write, draw or decorate one a day.  Here is where my real problem begins - WHAT do I put in that little square???  I already write in a daily journal, and the square is too small to write much anyway.  So far I have just been decorating them with a "stamp of the day", or a thought or funny thing that happened during the day. 

Next month I'll try a  double page, and I think my colour scheme is going to be RED for Valentine's day.  This will necessitate more ink sprays......

Until next time....

Wednesday, January 9, 2013

Happy 2013, Yes I'm still Around!

There is supposed to be a lovely photo that I took of an owl here, but for some reason, Blogger is not giving me the option of uploading it from my computer.  I must say if I had to do it all over again..... think I might be looking at a different blog service!

Anyway, it has been a long time since I last posted to this blog, not sure what happened to the time, but I will tell you I got a lot done in the way of Christmas cards and gifts!  My darling husband was getting a little worried, wondering if I would ever come out of my scrapbooking room again!   I managed to make 2 books, a pair of slippers (those I knitted!), a framed 12x12 scrapbooked page, a tea dispenser and a mini album.  All completed, and wrapped!

And now it's 2013, and time for some RESOLUTIONS.
1) Finish my current UFO afghan
2) Finish up my travel journals (I have a few unfinished ones hanging around)
3) No impulse shopping for scrapbooking/stamping/crafting items!

Okay, that's enough.
Here's to a happy and healthy 2013!

Until next time.....

Thursday, November 22, 2012

White Christmas

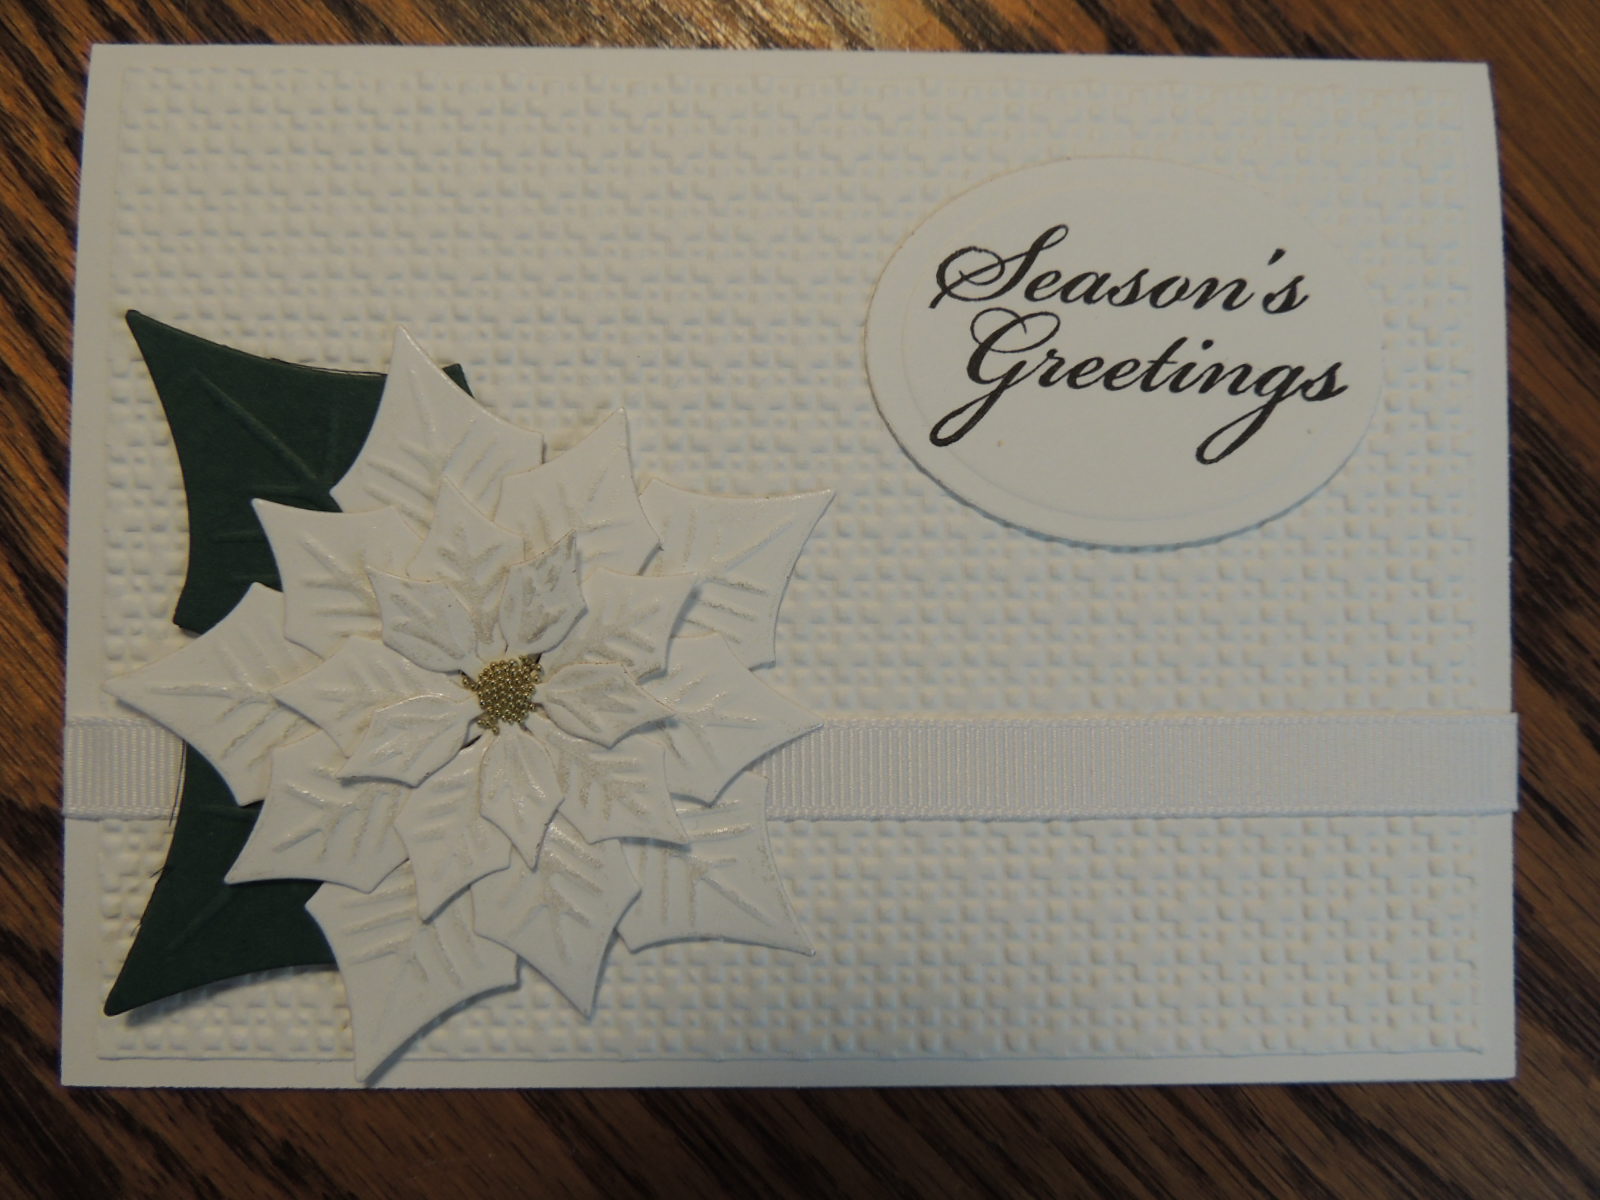
 Feeling guilty about having so much paper, including various Christmas papers, I decided to make my own Christmas cards this year.  However, knowing that most people just toss out their old cards, this gave me pause, imagining my creations in the blue box with old flyers and cereal boxes, or being used to light a fire, or in the garbage can next to the turkey carcass.  (Just for the record, I save any handmade cards I receive!)  Most people have no idea how much time or care goes into making things yourself!

With these thoughts in mind, I concluded that my cards would need
to:
1) Be quick to make
2) Use inexpensive materials
3) Not look quick and easy

I went onto the internet looking for inspiration, and saw quite a few designs for "white on white"  cards.  What a great idea!  Not only did I have white cardstock, it saved me from the AGONY of paper selection, plus it looks classy!   Luckily I had some green cardstock for the leaves, so I didn't have to leave the house to buy any additional supplies!  (Apart from the white ribbon, once I discovered I only had enough to make 4 cards). 

The background was stamped using a Stampin' Up embossing folder.  The poinsettia and label are both from Spellbinders.  The glimmer on the poinsettia leaves is Lumiere paint (pearl white), and centres are mico beads.

Of course, I still have all that Christmas paper left.....

Thursday, November 15, 2012

Calendar Considerations

For the past few years, I have been making the Basic Grey Calendars.  You may recall the concerns I had with matching the photos to the cute captions that BG supplied in the form of die cuts and chipboard stickers.  Well this year, it appears that Graphic 45 heard my teeth gnashing, and answered my prayers with a new set of papers with the calendar-preoccupied in mind.

I won't go into how nice the papers are, or what I'm going to do in regards to layouts (to be honest, I don't have a clue at this time!).  If I'm lucky, I'll be starting it in late December.  I still have to figure out some way to bind the pages together, which brings me to my next point.

Graphic 45 does have a Easle Albums for 12x12 or 8x8 layouts.  I almost bought one, until I realized SOMETHING.  The monthly foundation pages are 8x8 or 12x12, the exact same size as the easle album base pages, which includes the wire binding.  This means that you would either have to trim the foundation page borders off  to fit the papers (not going to do that!) or figure out some way to undo the binding, cut binding holes in the foundation paper, and rebind it (way too much work).   I notice that the easle albums are not shown on the G45 webside with the Place in Time papers, so maybe they didn't intend them to be used together.   I'm thinking I may just cut some kraft paper 8 1/2" x 8", and bind it myself with my Bind-it-All. 

Now I just have to decide on what photos to use....

UFO UPDATE:  The afghan is coming along nicely, but I have put it aside for now to work on Christmas cards (yes, for this year!).  I have made 16 cards so far (from kits, which should have made things quick and easy, but it didn't) and hope to make a few more with designs I have scrap-lifted from the internet.  No more kits.  Too many directions to follow.

Until next time....

Wednesday, October 17, 2012

Another Card - Not Hallowe'en!

I have to admit, I am not a great fan of Hallowe'en.  Oh sure, I love candy, and there is nothing quite like the smell of a semi-roasted Jack o' Lantern when you blow out the candle, but.... it seems like a lot of work for one night. 

Don't worry, I still give out candy to trick or treater's (even the older ones, but that could be just so they don't vandalize my house later) and I have a lovely plastic pumpkin I plug in and put in the window.

As I cruise the blogs and websites in cyberspace, I see a lot of Hallowe'en inspired cards, pages, tags..... so I thought I would do a seasonal looking card with nary a skeleton or witch in sight.  Just some nice oranges, browns and greens.

The flowers are coloured with Copics, and die cut with Spellbinders.  The butterfly is a 3D embellishment from K and Company.  The ribbon is Basic Grey (I've had it for years, don't know if you can still buy it anymore or not.)  You can't see it in the photo, but I added a little orange Stickles to the flower petals with a paint brush.  The paper is also from Basic Grey.

I know this is a simple looking card, but it has 3 great advantages:  1) Apart from the Stickles drying time, it's quick to make.  2)  It's not lumpy and bumpy and it fits in a regular envelope so it can be mailed.  3) It doesn't have any heavy embellishments, and it doesn't cost extra postage.

Until next time....


Saturday, October 13, 2012

Alaska Journal

 I was almost thinking I was going to have to rename this blog Yarn Persuasion or something, as I seem to have been doing a lot of KNITTING lately.  But here is my latest paper project, the travel journal I took on our most recent trip.

Usually I use my Bind-it-All to make journals, but this time I thought I might try coptic binding.  This is binding pages together by sewing them with linen thread.  I won't go into the how's of coptic binding, as there are many internet sites that show you in great detail.  That's how I learned to do it.   I will give you a few tips though:

     1) Make sure your thread is long enough.  I followed a mathmatical equation for calculating thread length, and it was too short.  I was not happy, because I had to redo the whole thing.I don't know if there is a way to add on to the thread and keep it looking neat.
     2) Don't pull the thread too tight.  If you do, the book won't stay closed.  It has to be tight enough to keep the signatures (that's coptic-speak for the page sections) from flopping about, though.  (A few more choice words were said as I redid the binding again)
    
The papers I used were Graphic 45 from the Rennasance Fair collection.  The flowers were punched from Memory Box and Sizzix dies.  Letters were punched using Quickutz Metro alphabet.   I embossed black cardstock with a clock embossing folder, then put some gold highlights on it.

Until next time...